
Probiotic Power!
Hello everyone. Sorry, I started my blog and then I got sick…bummer 🙁 . When I get sick I don’t feel well for a few weeks and I do as little as possible, so I am sorry. My secret kick-the-cold supplement is this bad boy along with a nice sized dish of these veggies! Yum.
Though now that I am feeling somewhat better I want to continue with posts about my GAPS journey. I do want to get my personal story about how I started GAPS sometime soon, but for now I want to share all my fermented vegetable creations! Some of then are pretty neat and I have a few tricks that I want to share with you, so your krauts turn out to be a success!

Dill brussel-sprouts sauerkraut.
I like to “spice up” my fermented veggies. It can get boring eating the same o’l fermented cabbage each day so I have been experimenting a lot. My favorite add-ins are…
- brussels sprouts & dill
- caraway seeds
- fennel & red cabbage
- garlic & cabbage
- mixed veggie melody
For now I will stick to my go-to recipe, and you can switch it up how you like. It’s amazing how good fermented veggies are for you and making them at home is a lot less expensive (especially if you are eating them every day). If I can’t make my fermented veggies and run out for some reason here is a list of the store bought ones I like.
- Bubbies pickles (not heated)
- Rejuvenate fermented veggies (100% raw)
- Bubbies sauerkraut (lightly heated to prevent exploding on the shelves)
- Goldmine organic RAW sauerkraut
- Pickled Planet Raw sauerkraut “immune boosting”
- Pickled Planet “beet kraut“
- Pickled Planet “dill kraut”
- Raw Kimchi
Books:
Recipes:
INGREDIENTS:
SUPPLIES:

1.) I Use Vegetable Starter Culture to jumpstart my ferments with good bacteria. I also use EcoBloom to help “feed” the starter. (optional)

2.) I follow the culture starter directions. I cup of 90 degree filtered water. I find that it helps to use a candy thermometer to be exact.

3.) I put in 1 scoop of the Ecobloom.

4.) I use 1 packet of the culture starter for many jars of kraut. I like to get as much use out of 1 packet so i sometimes use this starter water for 12 jars of kraut. Or after the veggies have been fermented i will take a spoonful or too and add it as a starter to the next batch. Just like you would with a yogurt starter.

5.) This is my new trick to get the jars from molding. I first put them in the dishwasher and let dry completely. Then i swish a little ACV in them to kill all the extra bad bacteria sitting around. It has worked for me so far. I also notice that when you add seeds, ginger, or garlic, onion (natures disinfectants) the jars don’t develop mold like the kraut with just salt.

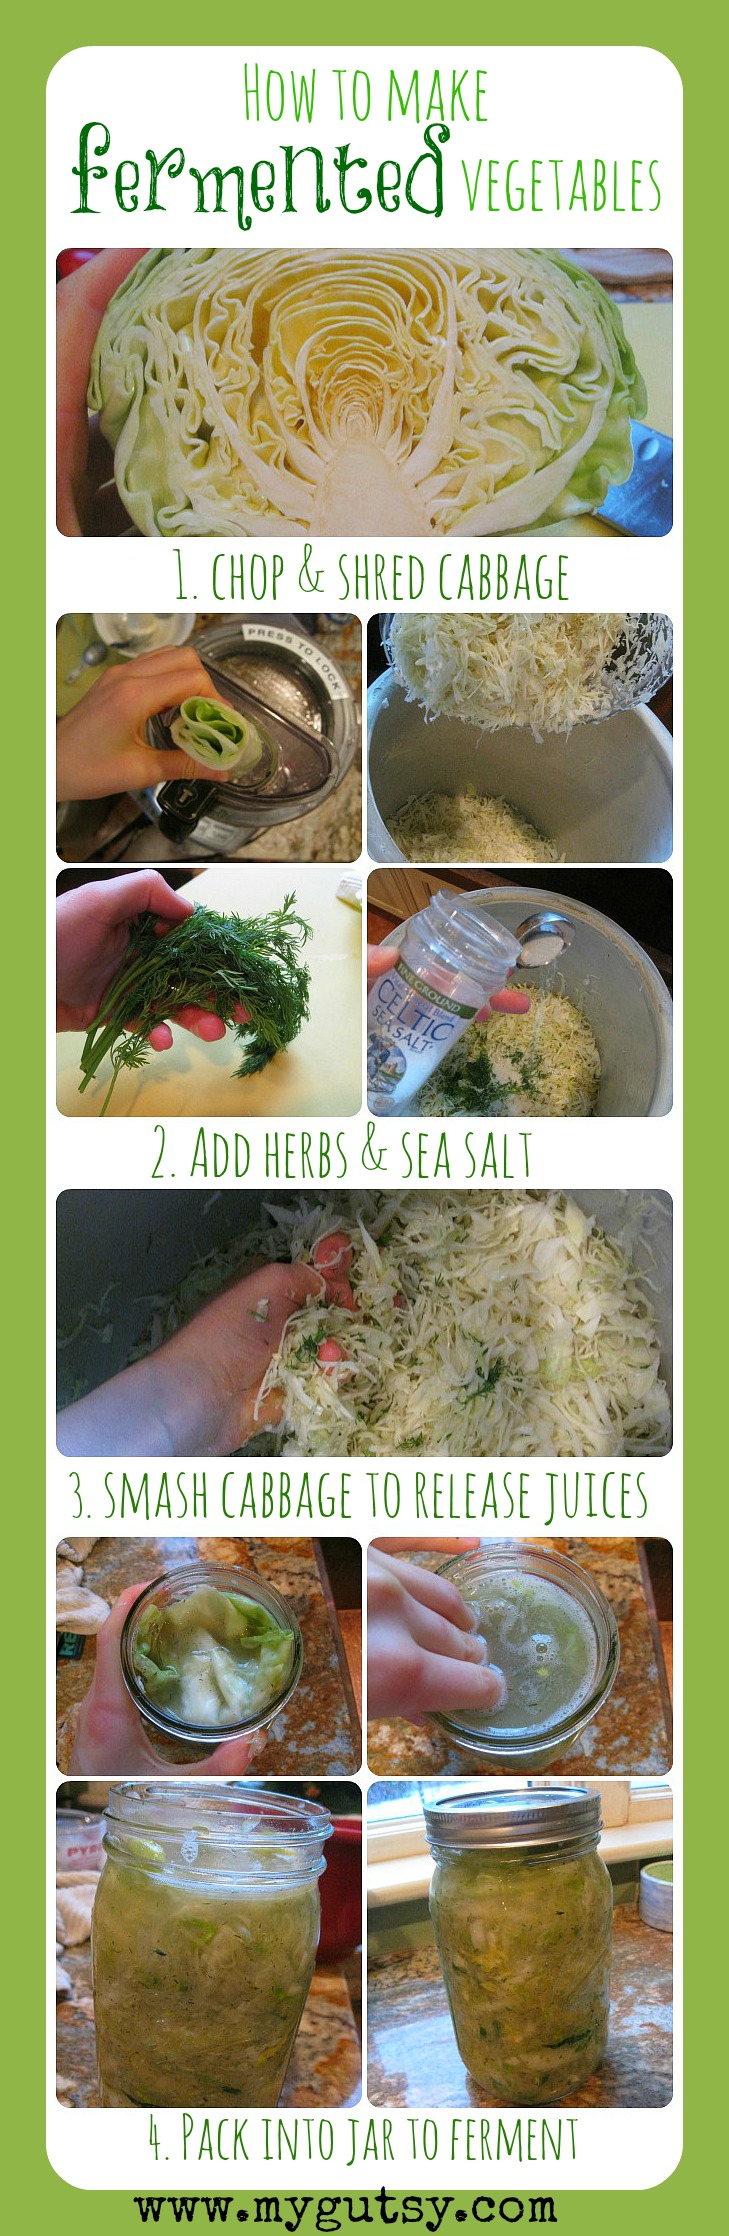
6.) Chop cabbage in quarters and de-core it. Take out that little white triangle on the bottom

7.) Chop cabbage into chunks to fit into the Cuisinart, or cut thin with your knife to get shreds.


8.) When i put my chunks into the Cuisinart I try to put them in a way so they will shred out to be think long pieces. I peel away the big chunks I cut and roll then up and stick them into the shredder. I use the thinnest shredding setting (1) on the Cuisinart blade.

9.) Shred away! I usually have to do a few emptying outs when I do a few heads of cabbage.

10.) The Cuisinart is very handy for making a lot of fermented veggies. It already takes a long time to shop for the veggies, wash then, and then cut them..using a Cuisinart or mandolin really helps cut down the time..and you get thinner shreds.

11.) Here is my 5 lb crock. I go back and forth fermenting in the crock or in jars. right now I prefer the taste of the jarred kraut, but I just need to learn how to ferment properly in my crock. any suggestions? I still use it as place to dump all my cabbage in though.

12.) Dump all the cabbage in to a big bowl or crock.

13.) Chop the fresh dill..I also have used dried and it tastes just as good

14.) Dump into the crock.

15.) Chop Brussels sprouts into shreds or put into Cuisinart.

16.) My general measurements are 2 TBS of sea salt for 1 medium head of cabbage. It is just right for me but play around with the salt to match your preference.

17.) I don’t have a pounder yet so I just squeeze it. I have learned that it helps to let it sit for 20 min or longer after you put in the salt and before you start squeezing. the salt helps release juices. I clean my dishes while i wait 🙂

18.) Squeeze! Looks like the juices are starting to break down.

19.) The more juice the better, and the more you break down the cell walls of the cabbage the quicker it will ferment too. Once the cabbage is translucent and flimsy you know it is done.

20) Pack into jars, leave about 1 nice from the top to let the cabbage have room to expand as it ferments. I always put a cabbage leaf on top, to keep out the potential mold from getting in the good stuff. Once it is fermented, you just peel of the top and dig in!

21.) Important step! press down on the cabbage until there is juice that submerges everything! you need this juice to keep mold from growing and to keep the kraut moist. You can always add more water onto if necessary. 
22.) this is what it looks like all ready for the lid.

23.) screw the lid on just until you feel it stop. don’t force a tight seal, it should be light.

24.) I store mine on cardboard, because frequently one or two explode. I also store it away in the mud room because its dark (I also drape a towel over the veggies too) and not everyone likes the smell in my family 🙂

25.) Here are all the fermented veggies I made. from the left top: Kimchi, spicy kimchi, caraway seed kraut. from the bottom left: sauerkraut, dill Brussels sprout kraut, dulse kraut, beet/carrot/red cabbage.
I LOVE to get creative with my fermented veggies. I also just made fermented cauliflower, green beans, carrots, asparagus, red fennel kraut (also my favorite), celery seed kraut, green onion kraut, garlic kale kraut, ginger, and fennel seed. I will post more recipes..which ones would you like to see?
If you want a quick easy way to get fermented veggies in your diet and can’t find any at your store, try my favorites!
Bubbies!- love their pickles 🙂
~stay gutsy, caroline


