05.17.2012

Creamy Carrot Chicken Soup

soup

Hello! Ready to cook?

The story of the soup…

My older sister just came home from college and she got the shock of being back at home and eating healthy food again. College food is so different from traditional food and it can totally mess up your body! Next year she is living in an apartment so I am going to teach her how to cook for herself, using all whole foods. She is a little nervous, but it is better she learns now 🙂

The GAPS diet for a college student!

Not only that but my mom and I are putting her on the GAPS diet. Right now we are slowly transitioning her. The past few days she has had no wheat, very little sugar, switched to raw milk, drinking bone broth, probiotic, fish oil, magnesium oil, a few bits of ferments (though she craves kimchi!!), and increasing veggies.soup step 1 revised

Teach and learn

Last night I taught her how to make soup, but by the time we finished she was feeling pretty anxious…I guess she is getting die off. She is doing her own blog about her personal journey http://mysummerdetox.wordpress.com/  My mom and I are playing dr. and she is the patient. She suffers from acne and cramps, so hopefully GAPS will clear some of it up, if not all of it. So here is the recipe we made together..


soup step 2

INGREDIENTS:

1/2 big head or 1 small head of cauliflower

7 carrots

2 onions

1 garlic clove

1/2 cup butter/ghee

8 cups of chicken broth

2 cups chicken shreds

1 tsp sea salt

(optional) grated raw cheese

(optional) few TBS raw milk or coconut milk or water

STEPS:

1. Roughly chop onions and garlic (remember you are blending it)

2. Sauté onions and garlic with salt and butter in big pot until translucent.

3. Wash and chop cauliflower and carrots (rough chop).

4. Add veggies and broth to pot and let it come to a boil

5. Once it boils for a few minutes, turn down to simmer until the veggies are soft. Not too hard but not over cooked (about 20 min)

6. Add the chicken shreds and let the soup cool down a little so you don’t burn yourself when scooping it in the blender. I use this one.

7. Scoop the soup into the blender, we had to do it in a few batches.

8. Blend until smooth (this is the time to add the raw milk and shredded cheese to give it extra creaminess).

9. Pour into bowls hot and top with extra a cheese if you want

10. Eat..yumm…and store the rest in ball jars in you fridge for later.

~Stay Gutsy, Caroline

disclosure 3
05.14.2012

GAPS Liver Pate

Long time no see…

Hello, again. I know have been gone for a long time. I thought it would be a good idea to try out a ton of recipes first and then be more prepared to share them with you all.

Today I am sharing a staple in my house…LIVER PATE! Liver Pate is a great way to hide that “livery taste”. Soaking the liver in milk or lemon juice for a few hours will reduce the “livery taste” even more. This is an easy recipe and I always make extra and freeze it. If you are on GAPS and cannot have butter yet, ghee would work perfectly too!

pate5w

INGREDIENTS:

1 tsp fresh sage, parsley, rosemary, and thyme (feel free to play around with the herbs you like). Dried is ok too, just use 1/2 tsp.

7 garlic cloves

1 medium onion

1 lb chicken livers

4 T butter/ghee

1 1/4  tsp sea salt

8 Tbs butter/ghee (cold)


DIRECTIONS:

img_4147

1. Chop you herbs, garlic, and onion. (It is getting blended so it doesn’t had to be perfect). I grated my garlic (with this mini grater), but it was a big waste of time 🙂

Screen Shot 2013-11-14 at 5.46.52 AM

2. Cube your 8 TBS of cold butter, and set aside.

img_4137

Screen Shot 2013-11-14 at 5.48.38 AM

3. Saute herbs, onion, garlic, 4 T butter–until soft

Screen Shot 2013-11-14 at 5.49.56 AM

img_4144

4. Add liver and cook–don’t over cook them, leave them a little pink. (It is ok to leave them a little raw if you freeze them for 3 weeks beforehand to kill off any bacteria. The liver retains its vitamins better if it is eaten raw.) I use this cast iron skillet.


img_4183

5. (optional) put in sieve (fine mesh) and stain out liquid for extra thick pate.

img_4184

6. Save the strained liquid in a little jar. Chill in the fridge and the layer of liver flavored butter will come to the top. This is AMAZINGLY flavorful butter! You can use the liquid for a stock or soup.

img_4187

img_4189

img_4190

7. Puree sautéed mix and 8 T of butter cut in cubes (I used my Cuisinart).

img_4193

img_4197

8. Put liver puree in a mold (I line a small baking cup with a plastic bag to make it easy to flip it out).

img_4202

9. Refrigerate until hard, and flip out of mold. Eat with veggies or crackers!


liver live


~Stay gutsy, Caroline


disclosure 3
03.02.2012

Fermented Veggies

Probiotic Power!

Hello everyone. Sorry, I started my blog and then I got sick…bummer 🙁 . When I get sick I don’t feel well for a few weeks and I do as little as possible, so I am sorry. My secret kick-the-cold supplement is this bad boy along with a nice sized dish of these veggies! Yum.

Though now that I am feeling somewhat better I want to continue with posts about my GAPS journey. I do want to get my personal story about how I started GAPS sometime soon, but for now I want to share all my fermented vegetable creations! Some of then are pretty neat and I have a few tricks that I want to share with you, so your krauts turn out to be a success!


fermentt

Dill brussel-sprouts sauerkraut. 

I like to “spice up” my fermented veggies. It can get boring eating the same o’l fermented cabbage each day so I have been experimenting a lot. My favorite add-ins are…

  • brussels sprouts & dill
  • caraway seeds
  • fennel & red cabbage
  • garlic & cabbage
  • mixed veggie melody


For now I will stick to my go-to recipe, and you can switch it up how you like. It’s amazing how good fermented veggies are for you and making them at home is a lot less expensive (especially if you are eating them every day). If I can’t make my fermented veggies and run out for some reason here is a list of the store bought ones I like.

Books:

Recipes:

INGREDIENTS:

SUPPLIES:


1.) I Use Vegetable Starter Culture to jumpstart my ferments with good bacteria. I also use EcoBloom to help “feed” the starter. (optional)

2.) I follow the culture starter directions. I cup of 90 degree filtered water. I find that it helps to use a candy thermometer to be exact.

3.) I put in 1 scoop of the Ecobloom.

4.) I use 1 packet of the culture starter for many jars of kraut. I like to get as much use out of 1 packet so i sometimes use this starter water for 12 jars of kraut. Or after the veggies have been fermented i will take a spoonful or too and add it as a starter to the next batch. Just like you would with a yogurt starter.

5.) This is my new trick to get the jars from molding. I first put them in the dishwasher and let dry completely. Then i swish a little ACV in them to kill all the extra bad bacteria sitting around. It has worked for me so far. I also notice that when you add seeds, ginger, or garlic, onion (natures disinfectants)  the jars don’t develop mold like the kraut with just salt.

6.) Chop cabbage in quarters and de-core it. Take out that little white triangle on the bottom

7.) Chop cabbage into chunks to fit into the Cuisinart, or cut thin with your knife to get shreds.

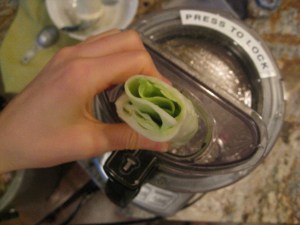
8.) When i put my chunks into the Cuisinart I try to put them in a way so they will shred out to be think long pieces. I peel away the big chunks I cut and roll then up and stick them into the shredder. I use the thinnest shredding setting (1) on the Cuisinart blade.

9.) Shred away! I usually have to do a few emptying outs when I do a few heads of cabbage.

10.) The Cuisinart is very handy for making a lot of fermented veggies. It already takes a long time to shop for the veggies, wash then, and then cut them..using a Cuisinart or mandolin really helps cut down the time..and you get thinner shreds.

11.) Here is my 5 lb crock. I go back and forth fermenting in the crock or in jars.  right now I prefer the taste of the jarred kraut, but I just need to learn how to ferment properly in my crock. any suggestions? I still use it as place to dump all my cabbage in though.

12.) Dump all the cabbage in to a big bowl or crock.

13.) Chop the fresh dill..I also have used dried and it tastes just as good

14.) Dump into the crock.

15.) Chop Brussels sprouts into shreds or put into Cuisinart.

16.)  My general measurements are 2 TBS of sea salt for 1 medium head of cabbage. It is just right for me but play around with the salt to match your preference.

17.) I don’t have a pounder yet so I just squeeze it. I have learned that it helps to let it sit for 20 min or longer after you put in the salt and before you start squeezing. the salt helps release juices. I clean my dishes while i wait 🙂

18.) Squeeze! Looks like the juices are starting to break down.

19.) The more juice the better, and the more you break down the cell walls of the cabbage the quicker it will ferment too. Once the cabbage is translucent and flimsy you know it is done.

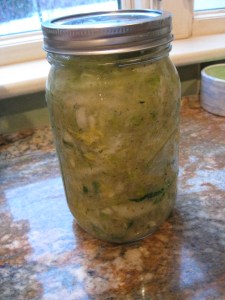
20) Pack into jars, leave about 1 nice from the top to let the cabbage have room to expand as it ferments. I always put a cabbage leaf on top, to keep out the potential mold from getting in the good stuff. Once it is fermented, you just peel of the top and dig in!

21.) Important step! press down on the cabbage until there is juice that submerges everything! you need this juice to keep mold from growing and to keep the kraut moist.  You can always add more water onto if necessary. 

22.) this is what it looks like all ready for the lid.

23.) screw the lid on just until you feel it stop. don’t force a tight seal, it should be light.

24.) I store mine on cardboard, because frequently one or two explode. I also store it away in the mud room because its dark (I also drape a towel over the veggies too) and not everyone likes the smell in my family 🙂

25.) Here are all the fermented veggies I made. from the left top: Kimchi, spicy kimchi,  caraway seed kraut. from the bottom left: sauerkraut, dill Brussels sprout kraut, dulse kraut, beet/carrot/red cabbage.

I LOVE to get creative with my fermented veggies. I also just made fermented cauliflower, green beans, carrots, asparagus, red fennel kraut (also my favorite), celery seed kraut, green onion kraut, garlic kale kraut, ginger, and fennel seed. I will post more recipes..which ones would you like to see?

If you want a quick easy way to get fermented veggies in your diet and can’t find any at your store, try my favorites!

Wise Choice market

rejuvenate foods

Bubbies!- love their pickles 🙂

sue sure


~stay gutsy, caroline

disclosure 3
01.24.2012

GAPS pancakes

Pancake Time!

This morning I made pancakes for my mom! She too is on GAPS but she can have almond flour, squash, and the whole egg..lucky her! I love to cook and she doesn’t have much tim,e so I got started. (I had a little fun making the picture as well!)

pancake

Step by step:

I always like to look at recipes with step by step pictures, I think it helps a lot and is more fun! This recipe was revised from the Internal Bliss cookbook. I changed up a few things: almond flour instead of almond butter, and pureed pumpkin instead of squash.

Taste like “donuts”!

They were “so good” my mom said and even my younger sister who doesn’t like my food (meaning GAPS food) loved these pancakes. She said they tasted like donuts and was shocked when I told her they had pumpkin in them!

Give these a try if you can have all the ingredients on GAPS or even if you are not on GAPS these are delicious!

egg

INGREDIENTS:

5 eggs

1 cup of almond flour

1 cup pureed pumpkin (use this canned pumpkin or puree your own)

1/2 tsp Sea salt

1 Tbsp cinnamon

1/4 cup dried shredded coconut

3 Tbsp Butter/ghee

PicMonkey Collage

DIRECTIONS:

1.) Separate 5 eggs into yolks (small bowl) and whites (medium bowl).

2.) Measure out 1 cup of almond flour and 1 cup of pumpkin ( I cheated and used this can, but normally we puree our own-learn how to here) into a big bowl.

3.) Add in 1/2 tsp of celtic sea salt and 1 Tbsp of cinnamon into the big bowl.

4.) Start to beat the eggs until they look like this, nice and stiff!

5.) Add in egg yolks and 1/4 cup of dried coconut (optional) into pumpkin/almond flour mix (big bowl).

6.) Fold in the egg whites-fold until incorporated fully.

7.) Get your cast iron pan buttered, this is big pan and I used about 3 Tbsp, you need a lot so they don’t stick. Be generous with the butter (otherwise they will stick)! Keep your pan at medium heat.

8.) Pour in a spoonful, don’t make them huge because they can be messy to flip, sometimes I make really small ones for fun!

9.) Flip when they start to turn brown on the bottom (this happens after about 1 min of bubbles forming around pancakes). I flip mine and then flip them back again because they always seem to ooze out more batter the first time I flip. They cook quick so watch out! **

10.) Serve and eat! I sprinkled them with dried unsweetened coconut and cinnamon- you can also top with coconut whipped cream! YUMMY! they make the kitchen smell wonderful too.

I always make the whole recipe and it ends up making a good amount, about 20, but it will vary on the size.

Notes

** after each batch of pancakes put an extra 1 tsp of butter on the pan to keep the pancakes from re sticking and they taste better too

These were the extras, perfect for a snack anytime of the day. You can also use them like bread and spread some almond butter and whole fruit jelly on them, or some coconut butter, or a drizzle of vanilla honey! get creative

You can substitute pureed squash for the pumpkin and use almond butter- (learn how to make it here) instead of almond meal. Lard, coconut oil, or any other kind of fat can be substituted for the frying part. You can also add in dried or fresh fruit, more spices, lemon poppyseed, or even make it savory with some crushed bacon bits and chives, again..get Creative..this is just your canvass! ENJOY

leftovers 🙂


~stay gutsy, caroline

disclosure 3
01.22.2012

My GAPS kitchen gadgets

Ok so lets start at the very beginning!

What it takes to cook real nourishing gutsy food you ask? Well, it takes determination, knowledge, skills, and the right tools. To get you started I want to share what my favorite, essential kitchen gadgets are. Remember that I am on GAPS right now so these utensils and appliances are a must for GAPS but also for everyday real food cooking! I have collected my food gadgets over the years from Christmas, birthday, Easter and any other holiday that involves gifts.

It takes practice to get to know your appliances and gadgets, and the best way to do it is to experiment with them and try out all and any foods in them…though sometimes it doesn’t work. I wanted you to see what kind of things I am using in my kitchen, though many things are not necessary but they are helpful and fun! a lot of them also have substitutes too, I will say so in my descriptions.

1.) Vitamix blender: the year I got this, I used it for everything. Now I mainly use it for my morning juices and pureeing soups. It is also very useful for smoothies, nut milks, and chopped veggies. I think it is worth while to get a good blender, other wise you will end up going through a few or several due to being a tad too hard on them. aka. grinding nuts and extremely frozen fruit! * A regular blender does work very well for simpler things (for foods that are made for a blender) , I am just too rough on them.

2.) Cast Iron pan: This is essential if you are going to cook anything on the stove, and you probably are if cooking real food or on GAPS. Also the extra iron can be very helpful for some people. At first i never liked using them because food would always stick. But the trick is to always oil it after using it. I wash it with water  and a little soap, dry it, and them drizzle some coconut oil in it a rub it around with a paper towel…after you do this a few times it will become a habit and VOILA! a nonstick pan without the teflon! I also believe that cast iron skillets are the perfect match for using the healthy amount of fat. To make a meal healthy you need fat and the cast iron will certainly tell you if you are not using enough!  * A regular stainless steel , or enameled (not nonstick!) pan can work too. I prefer to buy the unseasoned pan and season it myself (most companies use coy or corn oil)

3.) Stock pot: those of you on GAPS know the importance of this one! make sure it is stainless steel or something that won’t leach metals into your system, as well as all your other appliances. I use mine almost every day, its also nice to have a few of them!

4.) Cuisinart food processor: this one is new to me. I just got the 14 cup one for Christmas and have already used it several times. If you are going to make a lot of fermented veggies, onion chopping, nut butter making, or anything that requires a strong blade (slicing or chopping) this is helpful! I love how sauerkraut gets a really delicate shred with it. yum!  * A mandolin works well too for slicing thin, but honestly i have not used mine much. I guess it would be better for smaller projects and the want to use your hands 🙂

5.) Ball Jars: these are also a must. I use mine for everything, soup, salad, nut milk, juice, juice pulp, ferments, ground beef, liver, fish, pretty much everything. They are very inexpensive and wash very easily. Sometimes the lids rust but they are easily replaceable. I like these BPA free lids.

6.) Dehydrator: this one is also new to me. In the past I just used the oven, but it wasted a lot of every. I LOVE it and have already used it several times. So far I have made soaked and sprouted almonds, liver and heart jerky, and pulp crackers! I can’t wait to do some yogurt making in it. I feel it is worth the money if you plan to take food anywhere because i am constantly finding myself needing snacks while I am out, and anything dehydrated is super easy. *an oven works just a well but it takes much longer, you have to keep it a tad open for circulation, and its not so practical when you only have 1 oven.

7.) Crock pot: The old reliable crock pot is so good! when you need to cook food for along time (bone broth) or just keep something warm, the crock does the trick- and you can just forget about it..how often does that happen with real food cooking? I use mine every day too, I always have bone broth going.  I only have one but its not bad to have a few. Make sure to get a big one (to fit all those bones in), we have two of these.

8.) Cutting board: a good piece of wood is always a must.. though I also have BPA free plastic ones I use for garlic and onion so all my other food doesn’t smell. I love my glass cutting board too!

9.) Knife: for years I had dull knives and not until I got a new one recently did I appreciate a sharp knife. trust me, things go much quicker and smoother with a good knife.

10.) Nut milk bag: I use mine currently for juicing, but I also will use it for coconut and almond milk. I love squeezing the bag, it makes playing with food fun! * for a while used muslin from my fabric store, and it worked great

11.) Ladle: a good deep ladle is a definite for all those GAPS soups! I like one nice big scoop or 2 or 3 🙂

12.) Meat pounder: I rarely use it for what it is meant for. I am sure it is good to pound meat but I rely on mine to get my garlic quickly out of the shell. I will do a separate post on my way of getting garlic out fast, but for now I can tell you that i just pound away at those little nuggets and it makes life much easier!

* Some kind of mallot would work just as well.

13.) Silicone baking sheet: I did a little research and I read that silicone is supposedly safe, tell me other wise if it is not. I used to use unbleached parchment paper but I was using it too much and parchment paper really has a thin layer of silicone on top. When I roast veggies and don’t want to put olive oil on until the end,I use this. Also when I am chopping meat, fish, or veggies and then freezing it, I first lay the food on the silicone making it an easy come out. * parchment paper would be the replacement or if you are just using if for freezing, plastic cutting boards work great too!

14.) Flour sack towels: I love these towels; they soak up a lot, are light for draping over my ferments, and make a good barrier for on top of metal appliances.

15.) Sprouting jar: I have not used mine as much as I should, because I still end up buying sprouts. But I want to get back in the habit of sprouting some seeds. It is also ideal for sprouting grains. * a glass jar with some cheese cloth rubber band around the top woks in replacement.

16.) Mini spatulas: I use mine to scrape out of the Cuisinart, blender, and my ball jars. nothing beats a small spatula. I like the curved one over the straight one. – just be careful not to ruin yours by the sharp blade of the blender or Cuisinart 🙁 I ruined my favorite one.

17.) Funnel: I think having the jarring size (below) and the regular small nozzle funnel is important. The jarring funnel is good to keep things clean when putting food into jars, while the regular funnel is good to transfer apple cider vinegar, lemon juice, spices and those types of things into small lid bottles. * for dry things I sometimes use a paper plate and roll it up.

18.) Glass containers: Sometimes I don’t want to smash my leftovers into a jar so I use these nontoxic pyrex containers.

19.) Strainer: I use both the small/ medium and the sink size. I use the sink size for washing all my loads of veggies, and i use the medium and small sizes for straining broth and juice.

20.) Mixing bowls with spouts: You probably have your favorite mixing bowl, but mine right now are the ones with the little spouts at the end. I just wish they were not plastic :/ I love the spouts because after my broth is done boiling and cooled, I pour it into these bowls and then into the jars, it makes things go MUCH more smoothly. After I figured this out there were no more massive spills of broth spilling over the kitchen.

**update: found a glass one!!

21.) Big soup bowl: I found that on GAPS you need a big soup bowl. Soup is not always filling and I usually go back for second or thirds. Having your own big soup bowl is more ideal. I also think it is fun for everyone to have their own color. mine is light blue! Dont forget a big thermos for food on the go.

22.) Sauerkraut pounder : I don’t have one but I borrow one from my friend who teaches me how to make ferments! I would like to get some someday because it makes a huge difference in making good sauerkraut, its all about releasing the juices for a good fermentation!!

23.) Good water filter: I know this is not really a kitchen gadget but it is a necessary everyday kitchen MUST. I like the Berkey water filter with the ceramic filter (plus fluoride filters). I don’t trust regular filters (or the black berkey) with coconut carbon because they put antifungals to prevent mold (I know because I have reacted to a few). With Reverse Osmosis, you loose too many minerals.

24.) FreezerEither an extra freezer, which I have, or a chest freezer is important if you are going to start eating and preparing all your food. Freezing food allows you to buy it in bulk which means it will be less expensive!….right now in my freezer I have 7 lb of salmon roe, a few bags of bones, heart, liver, salmon bellies, beef, soup, broth, and frozen broccoli!

23.) Ice cube tray: I use mine to get cube size frozen food. I freeze broth, beef fat, soup, meat..anything I want to be small so i can quickly pop it out of the freezer and throw it in soup or on the stove.


24.) Juicer:  At first we had no juicer and I used the nut milk bag and blender…but after a lot of research that method was not the best. This slow sleep, cold pressed juicer keeps the enzymes in the juice active for 72 hours!! Thats huge, so you can make big batches and still keep fresh. We use ours every other day now and I’m so happy we went with this one. The reviews say its slow, but I don’t think so.

Screen Shot 2013-10-25 at 2.07.35 AM

I know I did not cover it all, but these were the top things that came to mind. Also note that I am not very advanced in the GAPS diet even though I have been on it for many months, my body is taking its time to heal. So I didn’t include things for making yogurt, cheese, oven roasting, grain milling, or grilling and etc.

If you have any other real food gadgets/ appliances that you rely on please share? also tell me what you use  and what items are worth the investment. I will be in the kitchen today, as usual, making sauerkraut- using my Cuisinart…but hmm any suggestions on what I could use to release the juices in replace of a pounder?

~Stay gutsy, Caroline


disclosure 3